Why Your AI Images Look Nothing Like You Planned
I still remember the first time I tried to use an AI image generator. I wanted a simple picture of a happy puppy playing in a sunny green park. I typed in a short sentence, clicked the button, and waited with pure excitement.
What appeared on my screen was a complete nightmare. The puppy had six legs, two tails, and a face that looked like a monster from a scary movie. I felt so confused and ready to give up right then and there.
Many people face this exact struggle when they start playing with these modern creative tools. You type in a dream, and the tool gives you a messy, weird-looking mistake. It feels like you are speaking one language while the computer is speaking another.
This constant failure can make you feel highly frustrated and tired. You waste hours typing the same words over and over, hoping for a lucky break. It ruins your creative mood and makes you feel like you are wasting your precious time.
You do not have to go through this annoying cycle anymore. The problem is not the computer program, and the problem is certainly not your imagination. The secret lies in learning how to speak to the machine in a way it actually understands.
Let us look at how you can change your words to get beautiful, clean, and perfect pictures every single time.
The Secret Recipe for Perfect Visual Words
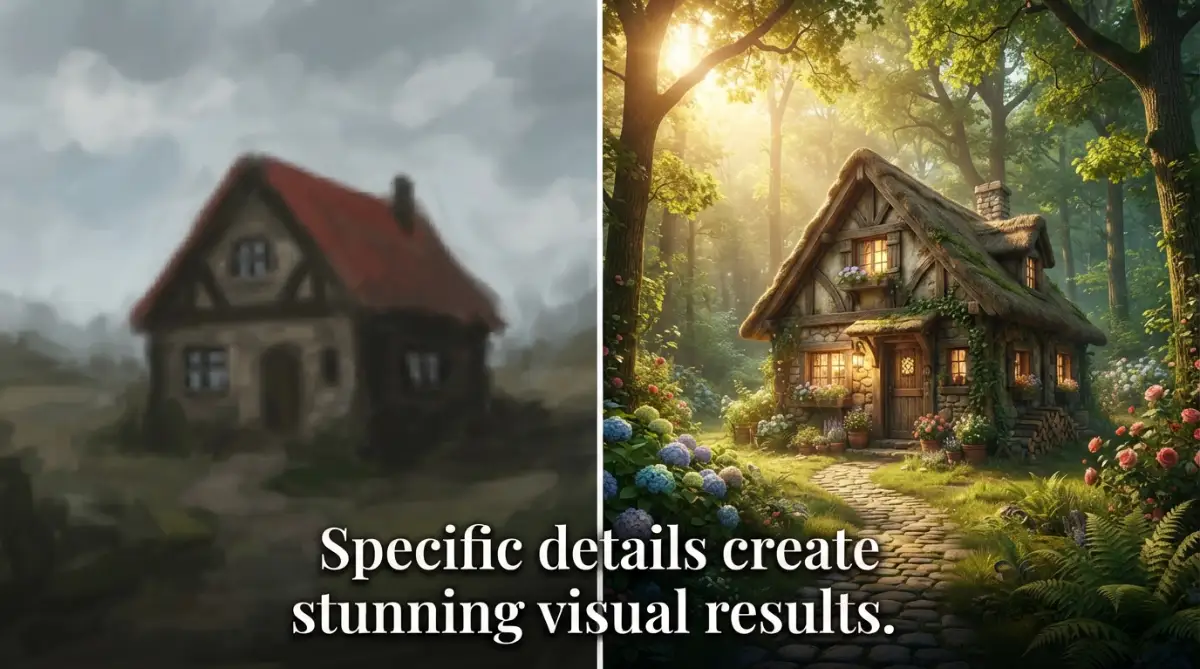
To get great results, you must understand how these tools read your written thoughts. They do not think like human artists who can fill in the blank spots using their own feelings. The computer needs clear, simple, and direct instructions to build your picture block by block.
Think of yourself as a movie director talking to a camera crew. If you just say "make a cool scene," the crew will have no idea what to do. But if you describe the room, the clothes, the lights, and the mood, they will build exactly what you want.
Let us break down the key parts of a great prompt so you can start writing them like a seasoned professional today.
1. Define the Core Subject with Clean Action Words
The first thing you must write is the main focus of your picture. This could be a person, an animal, an object, or a beautiful place. Avoid using weak, general words that leave too much room for wild guesses.
Instead of typing "a bird," try typing "a bright blue kingfisher bird sitting on a wet tree branch." This gives the machine a clear picture of what to draw first.
Using active verbs also helps the machine understand what is happening in the scene. A bird "flying fast through thick rain" looks much better than a bird that is just "there."
2. Build the Perfect Background Scene
A subject without a clear home looks floating and highly unnatural. You must describe the space around your main subject to give the picture deep meaning.
Is your subject inside a warm wooden cabin with a burning fireplace? Or are they standing under a bright neon sign on a wet city street at midnight?
Adding these tiny details tells the generator how to blend the subject with its surroundings. It creates a believable world instead of a flat and boring sticker.
3. Choose the Right Style and Visual Medium
If you do not specify a style, the computer will make a random guess. This is why you sometimes get a weird mix of a cartoon and a real photo.
You must state the exact artistic style you want right in your text. You can ask for a warm watercolor painting, a sharp 3D render, a classic oil painting, or a clean modern photograph.
Using these style words directs the tool to use the right artistic rules. It saves you from getting messy, confusing styles mixed together.
4. Control the Light to Create Mood
Light is the secret ingredient that makes a picture look highly professional or amateur. Bad lighting makes even the best subjects look cheap and flat.
You can use simple terms like "golden hour light," "soft studio lighting," or "moody blue shadows." These words tell the machine how to cast shadows and highlights across your subject.
Morning sunlight filtering through a dusty window creates a completely different feeling than a bright flash from a phone camera. Always spend a few words describing your light source.
The Secret of Camera Settings and Physical Details
If you want your pictures to look like real photos, you should use terms from real photography. This does not mean you need to be an expert photographer to get great results.
Using simple terms like "close-up shot," "wide-angle view," or "depth of field" works wonders. A soft-focus background makes your main subject pop out beautifully.
My Personal Realization:
I used to write huge paragraphs filled with words like "ultra-realistic" and "hyper-detailed." I quickly realized that these words actually confuse the machine and make the art look plastic. Once I started describing real-world textures like "rough wood grain" or "soft knitted wool," my results instantly became ten times better.
If you want to see how these prompt styles look in action, watch this short visual guide. It shows how minor changes in your text can completely transform your final art.
Watch this quick visual guide to see how small prompt changes create massive quality differences.
5. Steer Clear of the Annoying AI Buzzwords
Many beginners think that adding words like "4K resolution," "highly detailed," or "masterpiece" makes the picture better. In reality, these words do not help the generator at all.
The machine does not know what a "masterpiece" actually looks like because beauty is highly personal. Instead, describe the physical details that make something look high-quality.
Instead of writing "a high-quality coat," write "a heavy wool coat with visible neat stitching." The machine will understand the stitching detail much better than the word "quality."
Common Prompting Mistakes and How to Fix Them
To help you get the best results, let us look at some common mistakes that might be ruining your creations.
Writing Too Many Words
When you write a massive wall of text, the machine gets confused. It has to choose which words are important, and it often ignores the ones you care about most. Keep your prompts sweet, short, and packed with high-value words.
Using Negative Words in the Main Text
If you write "a forest with no trees," the machine sees the word "trees" and draws them anyway. Most generators do not understand negative words in the main prompt. Use the dedicated "negative prompt" box to list things you want to keep out of your picture.
Forgetting the Power of Color
If you do not specify colors, the generator will choose them for you. This often leads to bright, clashing colors that do not look good together. Tell the machine if you want a warm pastel color palette or a cool, moody blue theme.
The Ultimate Prompting Checklist for Daily Use
Before you click that generate button, run your words through this quick check list to ensure success:
- Subject: Is your main focus clearly named and doing an action?
- Details: Did you describe the skin, clothing, or material textures?
- Setting: Is the background world described with clear details?
- Lighting: Did you choose a light source and a time of day?
- Style: Is the artistic medium clearly stated?
- Camera: Did you specify the shot type or angle?
By following these simple steps, you will stop wasting time on bad images. You will start creating gorgeous, clean, and highly professional art that looks exactly like your original vision.
Hidden Techniques to Achieve Flawless Image Consistency
Getting one good image is relatively easy, but getting five matching images for a project is highly difficult. Professional creators use specific settings to make sure their visual style remains steady across different generations.
If you want to understand how the system translates your raw prompt into digital art, it helps to understand the underlying technology. You can learn more about how systems read patterns by exploring how machine learning predicts future trends in complex systems.
Once you know how these algorithms process patterns, you can command them with absolute precision. Let us look at the exact tools and commands you can use to control your creative outputs.
Mastering Parameters for Custom Aspect Ratios and Quality Controls
Most image generators default to a square box shape when you first run them. If you are creating a banner for your social media profile, a square shape will look terrible and get cut off.
You must learn to use aspect ratio parameters to shape your canvas before the machine starts drawing. For example, adding a simple ratio command to the end of your text changes the dimensions instantly.
According to the official Midjourney documentation, typing double dashes followed by letters like --ar 16:9 creates a perfect wide screen scene. This simple modifier saves you from having to manually crop and stretch your images later on.
You can also use quality parameters to decide how much processing power the machine spends on your project. If you are just testing an idea, you can ask for a fast, low-detail draft to save your generation credits.
Once you find a concept you love, you can crank the quality settings up to get deep, realistic textures. This clean way of working keeps your creative budget safe while giving you gorgeous final results.
Keeping Characters and Faces Consistent Across Multiple Generations
One of the biggest headaches for storytellers and brand managers is character drift. You generate a great character in one scene, but in the next prompt, their face and hair look completely different.
To solve this, you need to use the power of seed numbers to anchor your creations. Every single image generated by a machine has a hidden identification number called a seed.
If you find an image style or face you absolutely love, copy its seed number and paste it into your new prompts. This tells the generator to use that exact visual starting point instead of building a new face from scratch.
Some platforms also offer advanced character matching tools that let you copy a face directly. By pointing the generator back to your original character, you can place them in new outfits and actions without losing their identity.
This technique is highly important for anyone building a visual brand or an illustrated book. It transforms a random set of pictures into a clean, connected story that your audience can easily follow.
Setting Up Your Personal Workspace for Ongoing Creative Success
To keep your workflow smooth, you should organize your successful prompts in a dedicated folder on your computer. Keeping a simple text document of words that worked well will save you hours of trial and error in the future.
For those who want the best software tools for their business, finding trusted platforms is key. You can find excellent reviews on TrustPicksHQ to build your perfect digital toolkit.
Having the right tools ready to go makes your daily creative work feel incredibly easy and fast. You can focus on sharing your vision instead of fighting with bad software interfaces.
Some designers prefer using paid, cloud-based generators, while others prefer free, local programs that run on their own hardware. You can understand why many creators make this choice by seeing why smart small businesses switch to open source tools to save money and gain full creative control.
No matter which path you choose, staying organized is the true secret to long-term creative success. Keep testing new word combinations, save your favorite styles, and watch your skills grow every day.
The Hidden Mistakes That Silently Destroy Your Visual Art
Even the most passionate creators fall into simple traps that ruin their final images. These mistakes do not just waste your time; they can also cost you money if you are paying for monthly server access.
Let us look at these common errors with an open heart so you can avoid them completely.
The Danger of Prompt Bloat and Word Stuffing
When beginners do not get the image they want, they usually start throwing dozens of massive adjectives into the prompt bar. They write things like "hyper-detailed, 8k resolution, award-winning masterpiece, highly realistic, stunning light."
This behavior actually confuses the machine and makes your art look plastic and fake. The generator tries to give equal attention to every single word you wrote.
If you write too many descriptive words, the machine forgets your main subject entirely. It gets lost in a sea of adjectives, resulting in a cluttered mess with distorted shapes.
Writing prompts without a clear structure is like starting a massive home renovation project without a solid plan. Just like a sudden new kitchen remodel might void your home insurance if done without proper documentation, ignoring prompt structure can ruin your artistic results.
Instead of stuffing your prompt with buzzwords, focus on describing real-world elements with simple, natural language. Tell the machine exactly what the subject is holding, what they are wearing, and where the light is coming from.
Accepting the First Bad Draft and Giving Up Too Quickly
Many people click the generate button once, see a weird-looking hand or a strange background, and immediately delete everything. They assume the machine cannot understand them and close the app in anger.
This is a sad mistake because creative work always requires a few rounds of edits and patience. You must learn to negotiate with the machine to get the perfect final result.
When the generator gives you an image that is almost perfect but has one bad area, do not throw it away. Use tools like selective editing or inpainting to fix that one specific spot while keeping the rest of the image safe.
If you do not stand your ground and try to make adjustments, you will never get the masterwork you deserve. This patience is very similar to how to handle a lowball car insurance offer by standing your ground with clear evidence instead of accepting a bad deal right away.
Treat your first generation as a rough draft, not a final answer. Tweak your words slowly, change a parameter or two, and let the system try again with a better direction.
Ignoring the Power of Clean Notes and Organization
Another massive mistake is failing to write down your creative journey. You might get a beautiful, perfect photo by accident, but if you do not save the prompt and seed number, you will never be able to recreate it.
You need to keep a clean, structured record of what works and what fails. Just as learning how to document storm damage correctly requires a clean, detailed list to avoid rejections, writing prompts requires clean organization.
Keep a simple notebook or a digital file where you store your best-performing word combinations. This small habit will turn you from a lucky amateur into a reliable, professional digital artist.
Missing the Value of Small Parameter Tweaks
Many people only focus on the words they write and ignore the technical parameters at the end of the prompt. This is a huge missed opportunity because small parameter changes can save your entire budget.
By adjusting the style weight or changing the aspect ratio slightly, you can completely fix a broken image. This is very similar to how a simple credit boost can slash your insurance bills with minimal daily effort.
Spend time learning what the hidden buttons and commands do in your favorite generator. Those tiny adjustments will give you massive creative freedom and stop you from wasting valuable hours.
Your Simple Action Plan for Unlocking Beautiful Digital Art
Learning to write great prompts is like learning to play a new musical instrument. It might feel a bit awkward at first, but with a little practice, you will soon be creating beautiful work effortlessly.
Always start with a clear, active subject, set a beautiful background scene, choose a style, and direct the light like a professional filmmaker. Keep your sentences clean and short, and avoid using empty buzzwords that only confuse the system.
When you get a bad result, do not feel discouraged or angry. Treat it as a fun puzzle, adjust your words with care, and try again with a fresh perspective.
The digital world is waiting for your unique ideas and stories. By using these simple steps, you can finally turn your dreams into gorgeous, clean pictures that you can share with the entire world.
I still remember the pure joy I felt when my first perfect, clean image finally popped up on my screen. It felt like absolute magic, and I want you to feel that exact same excitement today. Grab your notebook, open your favorite generator, and start creating something beautiful right now.
Smart Solutions for Your Common AI Image Prompt Questions
Why do hands and fingers often look so strange in AI images?
Most AI models are trained on billions of flat pictures, so they struggle to understand how hands move in three-dimensional space. To fix this, you can write specific prompts that describe exactly what the hands are doing, such as "holding a warm ceramic mug" or "typing on a laptop keyboard."
Is it better to write short prompts or long sentences?
Short prompts are generally much better because they keep the machine focused on your main subject. When you write extremely long paragraphs, the generator gets confused and starts ignoring your most important details.
How can I make my generated photos look less like digital paintings?
You should avoid using empty terms like "photorealistic" and instead describe real camera settings and lighting. Try using terms like "shot on an 85mm lens," "soft natural morning light," and "visible skin pores" to get a clean, realistic photo.
What is the best way to get a vintage film look in my pictures?
You can easily achieve this look by referencing specific film brands and vintage camera styles in your text. Try adding phrases like "shot on 35mm Kodak Portra film" or "warm vintage analog look with soft grain" to get a gorgeous retro feel.
Creative Technology Disclaimer
This article is designed for educational and informational purposes only to help creators improve their digital workflows. The software tools and AI platforms mentioned in this guide are owned by their respective companies, and their features may change over time as technology updates. Always make sure to read the safety rules and copyright policies of any program you use before publishing your final art online.